Índice
We’ve all been there. You crush a run of 500 shirts—the colors are popping, the opacity is dead on. You get ’em boxed up and out the door to the client. Two weeks later, the angry email arrives: “The logo is cracking after one wash.”
For a screen printing business, this is a nightmare. It damages your reputation and costs money in reprints.
At ECOPRINTING, we understand the chemistry behind the ink. As an OEM manufacturer of high-quality PVC free plastisol ink, we treat this issue daily. The short answer? 90% of the time, ink cracks because it didn’t reach the correct curing temperature all the way through the ink layer.
In this guide, we will break down exactly why this happens, the science behind the “crack,” and how to fix it permanently using industry best practices.
The Science of the Crack: Fusion vs. Gelling
To stop cracking, you must understand what plastisol ink actually is. Unlike water-based inks that dry by evaporation, plastisol is a thermoplastic. It doesn’t “dry”; it cures (fuses).
Think of plastisol ink like a chocolate chip cookie.
- Gel Stage (220°F / 104°C): The ink is dry to the touch but hasn’t fused. It’s like a cookie that looks done but is still raw dough in the middle.
- Full Cure (320°F / 160°C): The PVC resin and plasticizers cross-link completely, creating a solid, elastic film.
If your ink stops at 290°F, it’s only in the ‘gel’ stage. It looks finished on the board, but once it hits the washing machine, the mechanical action will snap those weak bonds, causing the print to crack.
Top 3 Reasons Your Prints Are Cracking
Based on our lab data at ECOPRINTING and industry standards, these are the three most common culprits.
1. Under-Curing (The Silent Killer)
This is the most common cause. Many printers confuse dryer temperature with ink temperature.
- Just because your dryer is set to 350°F doesn’t mean the ink reached 320°F.
- The Issue: If the conveyor belt is too fast, the ink surface might hit 320°F, but the bottom layer (touching the cool shirt) might only reach 280°F.
- The Result: Surface tension holds for a while, but the “uncooked” bottom layer fails under stress.
Industry Insight: According to lawson screen & digital products, cracking is almost exclusively a symptom of thick, under-cured ink deposits, while washing out completely indicates a severe under-cure.
2. Fibrillation (The “Fuzzy” Crack)
Sometimes, the ink isn’t cracking—the shirt is breaking through the ink. This is called fibrillation.
- What happens: During washing, the fibers of the cotton fabric untwist and poke through the ink layer.
- Appearance: The print looks faded or “frosted,” which customers often confuse with cracking ink.
- Prevention: This requires a smoother underbase or a specific “mat-down” screen to flatten fibers before the final cure.
3. Ink Deposit Thickness
- Too Thick: A “bulletproof” print (heavy deposit) is more rigid. If the ink is thicker than the fabric’s ability to stretch, it will snap and crack.
- Too Thin: If you don’t lay down enough ink on a rough fabric (like a pique polo), the ink film isn’t strong enough to bridge the gaps in the weave.
How to Test for Cure Before You Ship
You should never wait for a customer to tell you your ink isn’t cured. We recommend implementing these two tests into your daily production workflow.
The Stretch Test
This is the quickest way to check cure quality right off the belt.
- Let the shirt cool down completely (do not test while hot!).
- Grab the print and stretch it about 20-30% of its width.
- Pass: The ink stretches and returns to shape.
- Fail: The ink cracks like dried mud. This means it is under-cured.
The Wash Test
According to ECOPRINTING lab, the ultimate durability test is actual laundering.
- Take a reject shirt from the run.
- Wash it in hot water and dry it on high heat.
- Repeat 3-5 times.
- If the print survives this “torture test,” it will survive your customer’s gentle cycle.
Solving the Problem: A Step-by-Step Guide
If you are experiencing cracking, follow these steps to resolve it immediately.
Step 1: calibrate Your Dryer with a Donut Probe
Do not rely on a laser temp gun. Laser guns only read the surface temperature.
- Best Practice: Use a “Donut Probe” (a thermal probe that sits on the shirt surface). Run it through the dryer. It gives you a readout of the exact temp the ink hit, plus how long it stayed there—that’s your dwell time..
- Target: You need the ink to reach 320°F (160°C) and hold it for at least 45 seconds to ensure cross-linking.
Step 2: Adjust Dwell Time, Not Just Heat
If your ink isn’t curing, slow down the belt. Don’t just bump up the temp; you’ll scorch the tees and yellow the whites. Slow down the belt so the heat can soak through the ink without cooking the shirt.

Step 3: Switch to High-Elasticity Inks
Not all plastisols are created equal. If you are printing on sportswear or 100% cotton that shrinks, you need an ink that moves with the fabric.
At ECOPRINTING, we specialize in PVC free plastisol ink.
- Why it helps: Our PVC-free formulas typically offer a softer hand and higher elasticity than traditional rigid plastisols.
- Eco-Benefit: They are free from phthalates and heavy metals, meeting strict environmental standards like OEKO-TEX, which is a major selling point for B2B buyers in Europe and the US.
Internal Case Study: Saving a 5,000 Shirt Order
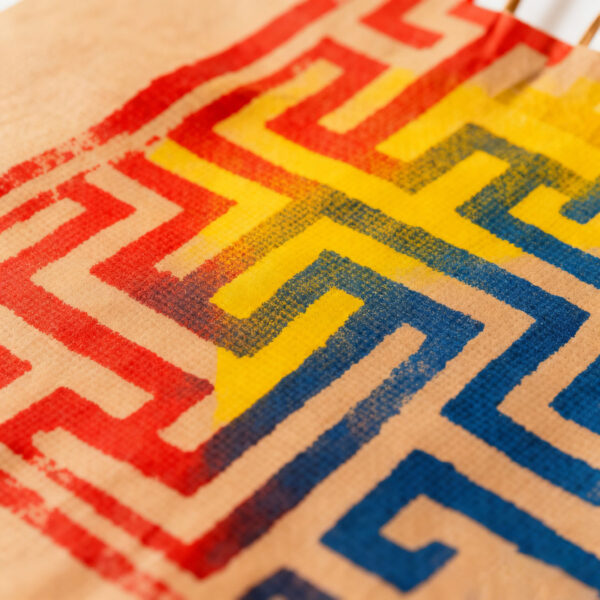
We recently consulted for a client printing on heavy canvas tote bags. Their prints were cracking immediately.
- The Diagnosis: The heavy canvas acted as a heat sink. It absorbed all the heat from the dryer, preventing the ink (which was a thick athletic white) from reaching 320°F.
- The Fix:
- We switched them to our high opacity tinta plastisol branca.
- We added a flash cure station to pre-warm the bags.
- We slowed the belt speed by 15%.
- Result: Zero cracking, and the ink passed the scratch and wash test perfectly.
Why Choose PVC Free Plastisol Ink?
The whole game is changing. Sure, traditional plastisol is bulletproof, but PVC Free is where it’s at now. That’s the future if you want to stay green.
| Característica | Standard Plastisol | ECOPRINTING PVC Free |
| Curing Temp | 320°F (160°C) | 300°F – 320°F (Lower energy) |
| Elasticidade | Low to Medium | High (Resists cracking) |
| Hand Feel | Heavy/Plastic | Soft/Breathable |
| Conformidade | Phthalate-free (usually) | PVC & Phthalate Free |
If you are looking for additives to improve the stretch of your current ink, check out our auxiliary & additives section.
FAQ: Frequently Asked Questions
Q: Can I use a heat gun to cure plastisol ink?
A: For professional orders? No. A heat gun provides uneven heat. You might cure one spot but leave another spot raw, leading to cracking. Use a conveyor dryer or a heat press for consistent results.
Q: Does white ink crack more than black ink?
A: Yes, because white ink is thicker (it has more pigment like titanium dioxide). Thicker ink deposits require more heat energy to cure all the way through.
Q: My ink is cracking, but I cured it at 320°F. Why?
A: You likely measured the air temp, not the ink temp. Or, you cured the surface, but the layer touching the shirt remained under 300°F. Use a stretch test to verify.
Q: Is silicone ink better for preventing cracking?
A: Tinta de Silicone has the highest elasticity of all inks. If you are printing on spandex or yoga pants, silicone is the superior choice over plastisol.
Conclusão
Cracking ink is almost always a temperature management issue. By regularly testing your dryer, performing stretch tests on every batch, and using high-quality elastic inks like those we manufacture at ECOPRINTING, you can eliminate returns and keep your customers happy.
Ready to upgrade your production? Explore our range of eco-friendly tintas para serigrafia and find the perfect solution for your next project.